Learn how to Contribute to Open source and Github projects - Tutorial
When collaborating on shared projects (no matter private repositories on Gitlab, Bitbucket etc, or public repositories on Github) we should know how to propose our piece of code and how to contribute on these projects. In this tutorial I'm going to show you how you can push your code and your addition into open-source projects on Github. We push these additions through a Pull Request/PR (or merge request).
Note: take attention that we want to contribute on projects that we do not have push permission. If you own a repository or you are part of an organization that gave access to you so that you will have full access to your repository, therefore you do not need to create a pull request and you can directly push to your repository.
You must know Git basics to follow this tutorial. Here are some online materials: Git tutorial, Git Cheat sheet.
Now let's see what are the available options to make a PR.
The ways you can push your code..
There are different ways to push your code, for example you can make a PR through web interface editor (practical for small tasks), you can use GUI tools, almost all GUI git client tools support Pull Request submission, or you can do your git work with git CLI tool.
Let's start with the simplest option to get familiar with the general flow.
Quick and simplest way: Web interface
You probably have already tried it, but it's a good idea to take a deeper look. Let's go to the repository you want to push your changes, and navigate to your file through Github web file explorer. Here I try to add a new line to one of the PrestaShop Github project files, classes/Cart.php.
To start editing the file you should click on the pencil icon on top right:
![]()
Now, we can see the code editor:
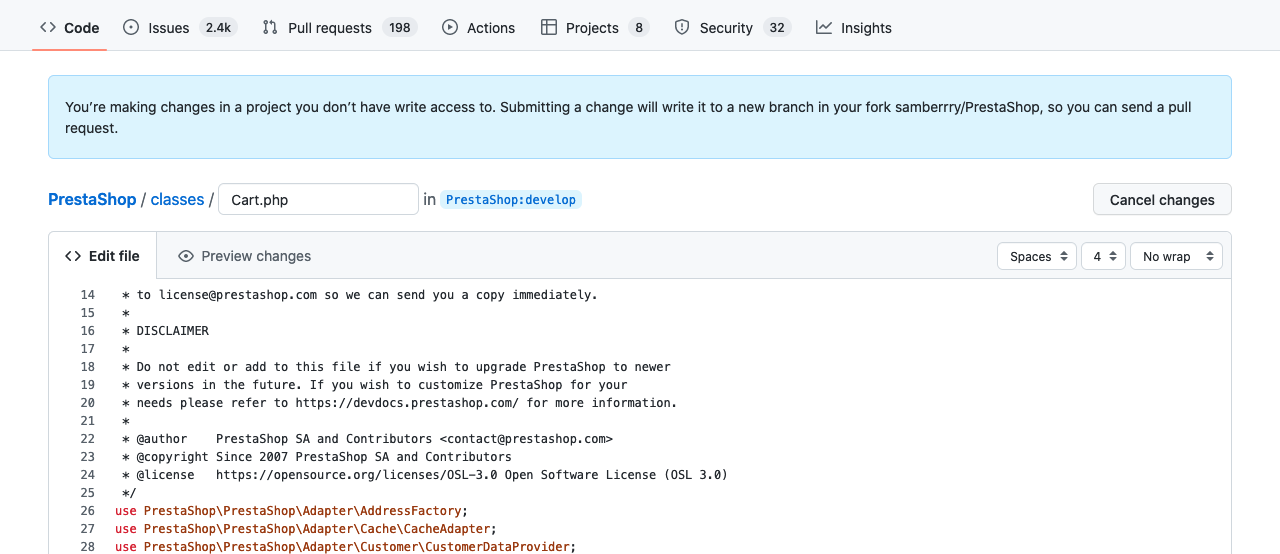
Take attention to this statement:
You’re making changes in a project you don’t have write access to. Submitting a change will write it to a new branch in your fork samberrry/PrestaShop, so you can send a pull request.
samberrry is my Github handle.
I changed a line by adding a new line and then navigated to the bottom of the page to fill Propose changes form:
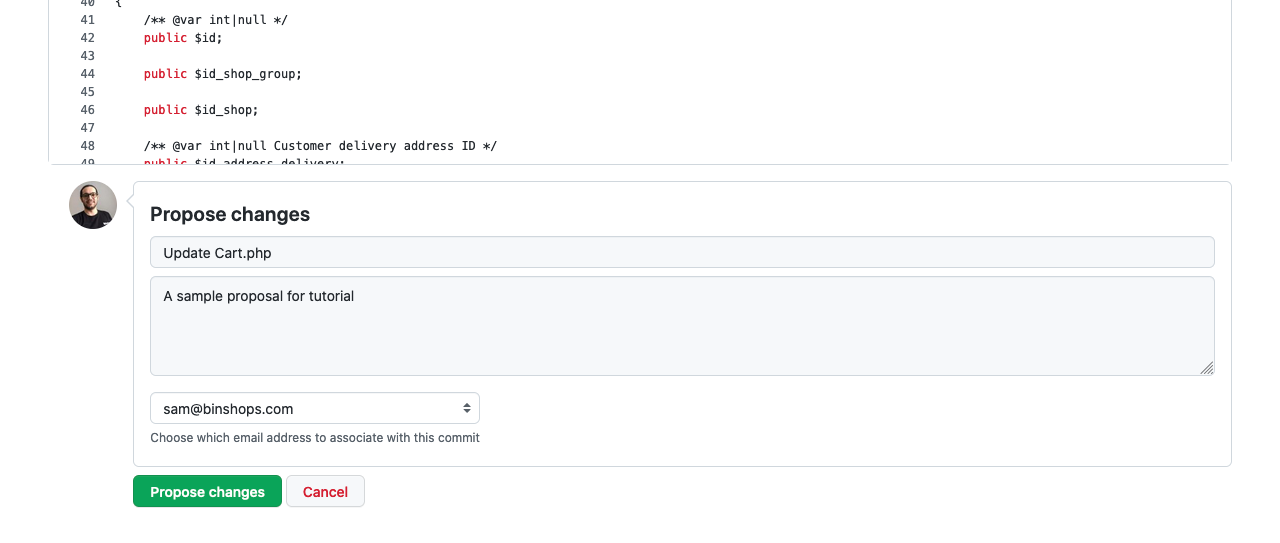
By clicking Propose changes Github will fork the current repository into your Github account and then creates a new branch. But why?
To create a new Pull Request and to propose your changes, first you need to have an exact copy of that repository on our own account. Call this copy a fork. When you fork a repository it means that you are copying an exact version of that repository, after that you have the full control of that newly exact copy (I mean the fork), so you can create an new branch on your fork. This newly created branch will be used to make a PR on the main repository. Almost all management platforms for Git repositories (like Github, Gitlab ,etc) have this flow.
Once you clicked on Propose changes you will be redirected to the Create pull request page.
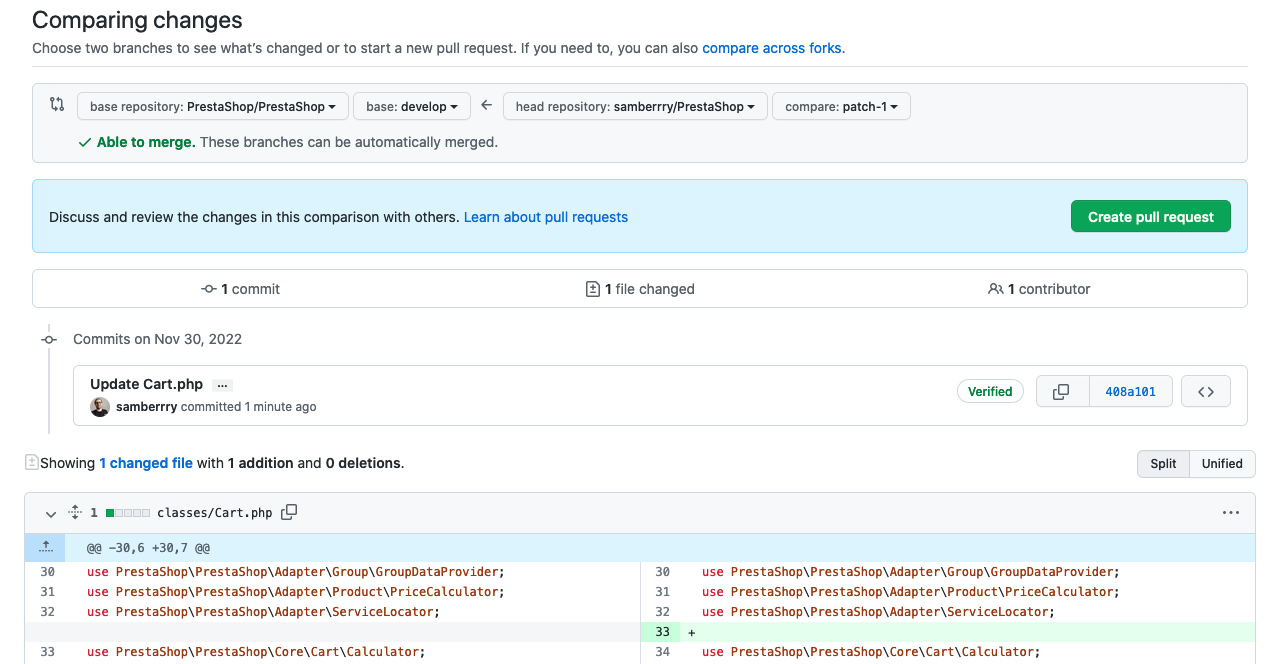
This is the final step in creating your pull request, here you can review your changes and you can change your base branch. By clicking Create pull request, a new pull request will be created, you can track it through Pull requests section in the main repository.
That is all about pull requests, but we don't usually do this in daily development. I will explain a more practical approach in next sections.
Now, let's check the available tools to work with git.
Which tool should I use?
I recommend to use GUI tools, this way you can better handle complex scenarios, and with the help of graphical and tree history view of your git repository you will have a better understanding of the project state. Now, let's choose your git client tool.
A list of git client GUI tools
Check out this link to see a list of GUI tools. There are extensions available for VsCode that many developers use them, and there is a built-in tool in JetBrains products too. Here I use Gitkraken in the next sections, it's free for publicly-hosted repositories.
Also, Github has an open source GUI tool Github Desktop which could be a good option, but it's missing some features like tree view to show branch history, if you want to track why there is not such a feature on Github Desktop, here are some links issue #5468, issue #1634.
A quick look at one of my local repositories opened in Gitkraken.

Now let's check a more practical scenario.
How we contribute on real projects..
We have seen the general flow of creating a pull request so far, but we normally develop code on our local systems, so we need to get the code and run it on our local setup, and then making changes and finally proposing the increment.
In 2022, we have been stuck to our local systems for software development, this process may change in the future and probably we will not need systems to run code. Let's take a look at Github Codespaces, this may change the development experience and the contribution process. However, at the time of writing this article we know that we still need our local systems to run codes.
Now let's see the steps of creating pull requests in real projects.
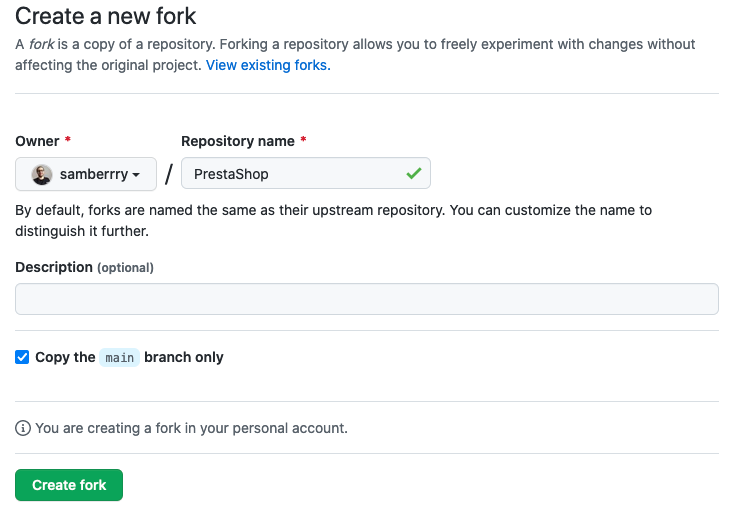
Step 0: Let's go to the repository home page and fork the repository
At top right of the repository home page, click on fork button, and then you will be redirected to Create a new fork page.
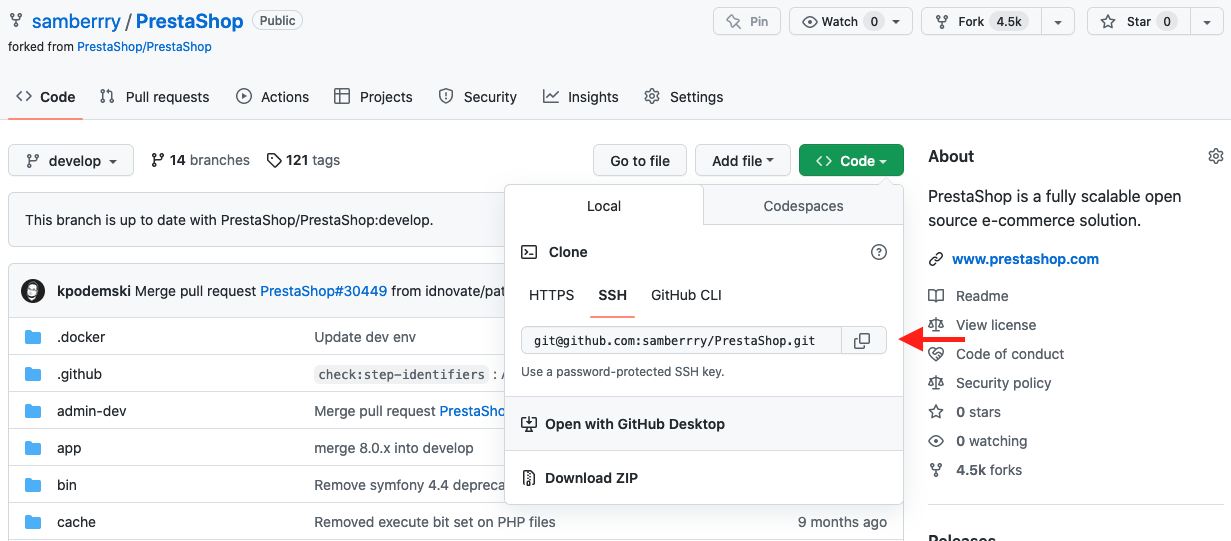
Step 1: Copy the forked repository link
Now let's copy the forked repository link. SSH or HTTPS? ssh is more secure, but it needs to be configured on your local system and your Github account (Setup SSH for Github). You can use HTTPS link but you have to enter your credentials for each code push/pull.
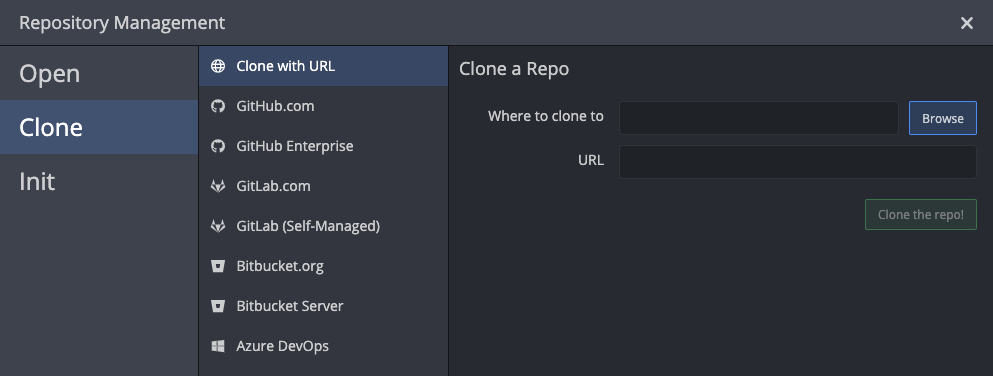
Step 2: Clone the forked repository
GUI tool
Most Git GUI tools have an option to clone a repository. For example, in Gitkraken you can connect to different platforms, so you can easily clone the repository. You may already tried it.
Terminal Git CLI
You may already cloned the main repository somewhere, not the forked repository (you can do this for several reasons, for example you want to track and see all changes on the main repository on your local system). You can still work with on the same local repository, by just adding a new remote to the existing local repository. This way you can keep track of the main repository along with the forked repository at the same time.
git remote add origin https://github.com/USER/REPO.git
// rename origin name to avoid conflict with default origin
If you have not cloned anything on your system, it's easier to just have one version and you can skip this box, so clone the forked version.
Step 3: Create a new branch
GUI tool
Just right-click on your desired branch:

Terminal Git CLI
Important: On which branch should you make your PR?
Projects usually have two types of branches, one for development and another to track releases. Dev branches usually named dev or develop and primary branches named main or master. This is a general naming, different projects may have different conventions. However, normally we use develop branches to make our PRs. Usually, we can get more info about the development conventions in the README file (or home page) of the repositories.
You may noticed that when forking the repository there is an option: Copy the X branch only which is checked, if you keep it checked it just fork the default branch of the main repository, but you may need other branches. Uncheck it if you only need a specific branch.
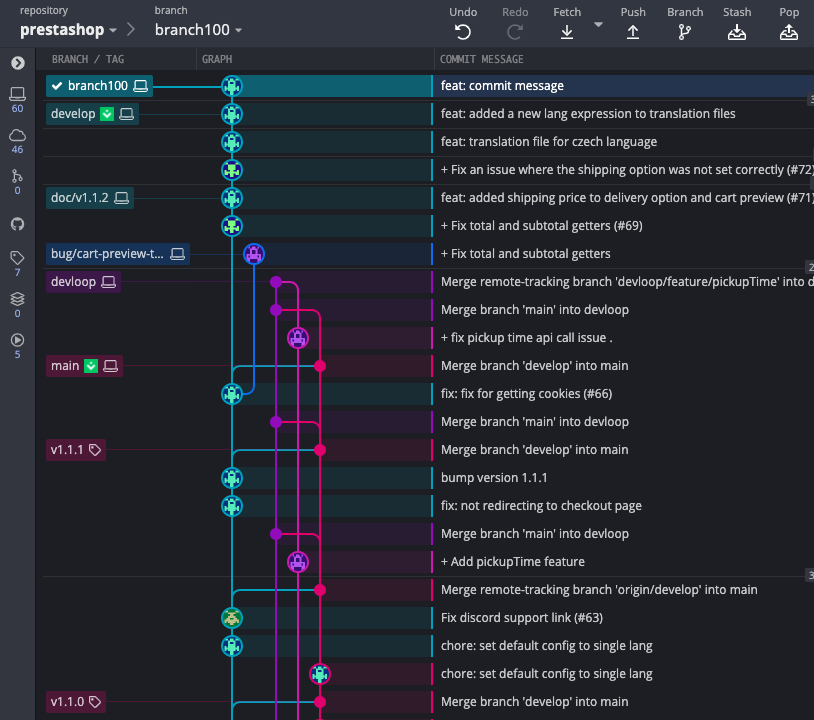
Step 4: Make changes and commit
Make changes on code within your IDE, and then stage and commit your changes. I created a new branch (branch100) on my local repository (this is my local version for Vue Storefront integration with PrestaShop), then I made small changes and committed, now my local repository looks like this:
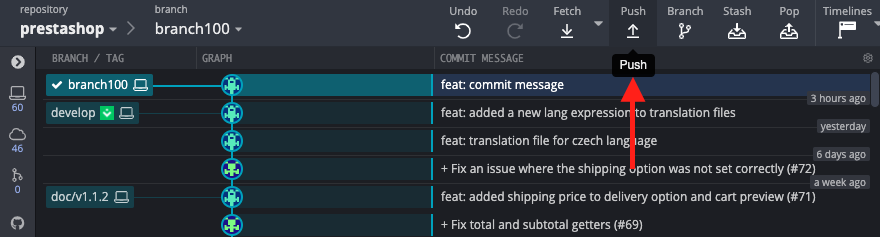
Step 5: Push your local branch
GUI tool
Terminal Git CLI
git push origin yourbranchname
If you are getting You do not have access to this repository message, you are probably trying to push your branch on the main repository. Take attention that you must push your branch to the forked repository (check your remotes).
Step 6: Submit your Pull request
Once you push your local branch, a Create pull request option will be available on your Github fork repository. Go to your forked repository on Github, and click on the Create pull request, follow the steps and finalize your pull request.

General steps to create a pull request
- Fork repository and clone it to your local system
- Create a new branch
- Make changes and commit changes to the branch
- If changes are local, push them into fork repository
- Make pull request through pushed changes
How do I practice?
If you would like to practice the flow, and see how the contribution works, I think you can easily do it in open world. My suggestion is translation. Let's start by the easiest parts of frameworks, platforms and probably translation would be an option.
What is next?
Congrats! Now you did your first contribution on a shared project, but you will probably face other scenarios. For example, if you do not work on the project (for a period of time), and the main project goes on, the result is that your fork, and your local version gets obsolete. This may cause some problems that I will cover it in next sections.
Posted 3 years ago by